> ## Documentation Index
> Fetch the complete documentation index at: https://serval-hannah-docs-custom-access.mintlify.site/llms.txt
> Use this file to discover all available pages before exploring further.
# Envoy
## About Envoy
Envoy is a modern visitor management platform that helps organizations create a welcoming and secure workplace. The Envoy API enables workplace management and visitor invitation workflows.
## What the Envoy integration enables
| Capability | Description |
| -------------------- | ----------------------------------------------------------- |
| Workplace Management | Manage workplace operations and configurations |
| Visitor Invitations | Create and manage visitor invitations and related workflows |
***
## Setting up Envoy API Access
This guide will walk you through setting up client API key authentication for Envoy, which is ideal for integrating with Serval.
### Step 1: Create or identify an authorized API User
Before you can access the Envoy API, you need to set up a dedicated API user account:
1. Navigate to your [Envoy employee directory](https://dashboard.envoy.com/employees)
2. Click **Add Employee** to create a new employee manually
3. Fill in the required information for your API user:
* Use a service account email (e.g., `api-user@yourcompany.com`)
* Assign a **Global Admin** role to ensure full API access
4. **Important**: Disable the setting **"Show employee as a host on the Visitors Kiosk"** to prevent the API user from appearing in visitor-facing interfaces
Ensure the API user has Global Admin permissions to access all necessary API endpoints. Limited roles may restrict API functionality.
### Step 2: Create an Integration in the Dev Dashboard
Next, you'll need to create an integration to generate your API credentials:
1. Visit the [Envoy Dev Dashboard](https://dashboard.envoy.com/dev-dashboard)
2. Click **Create New** to start a new integration
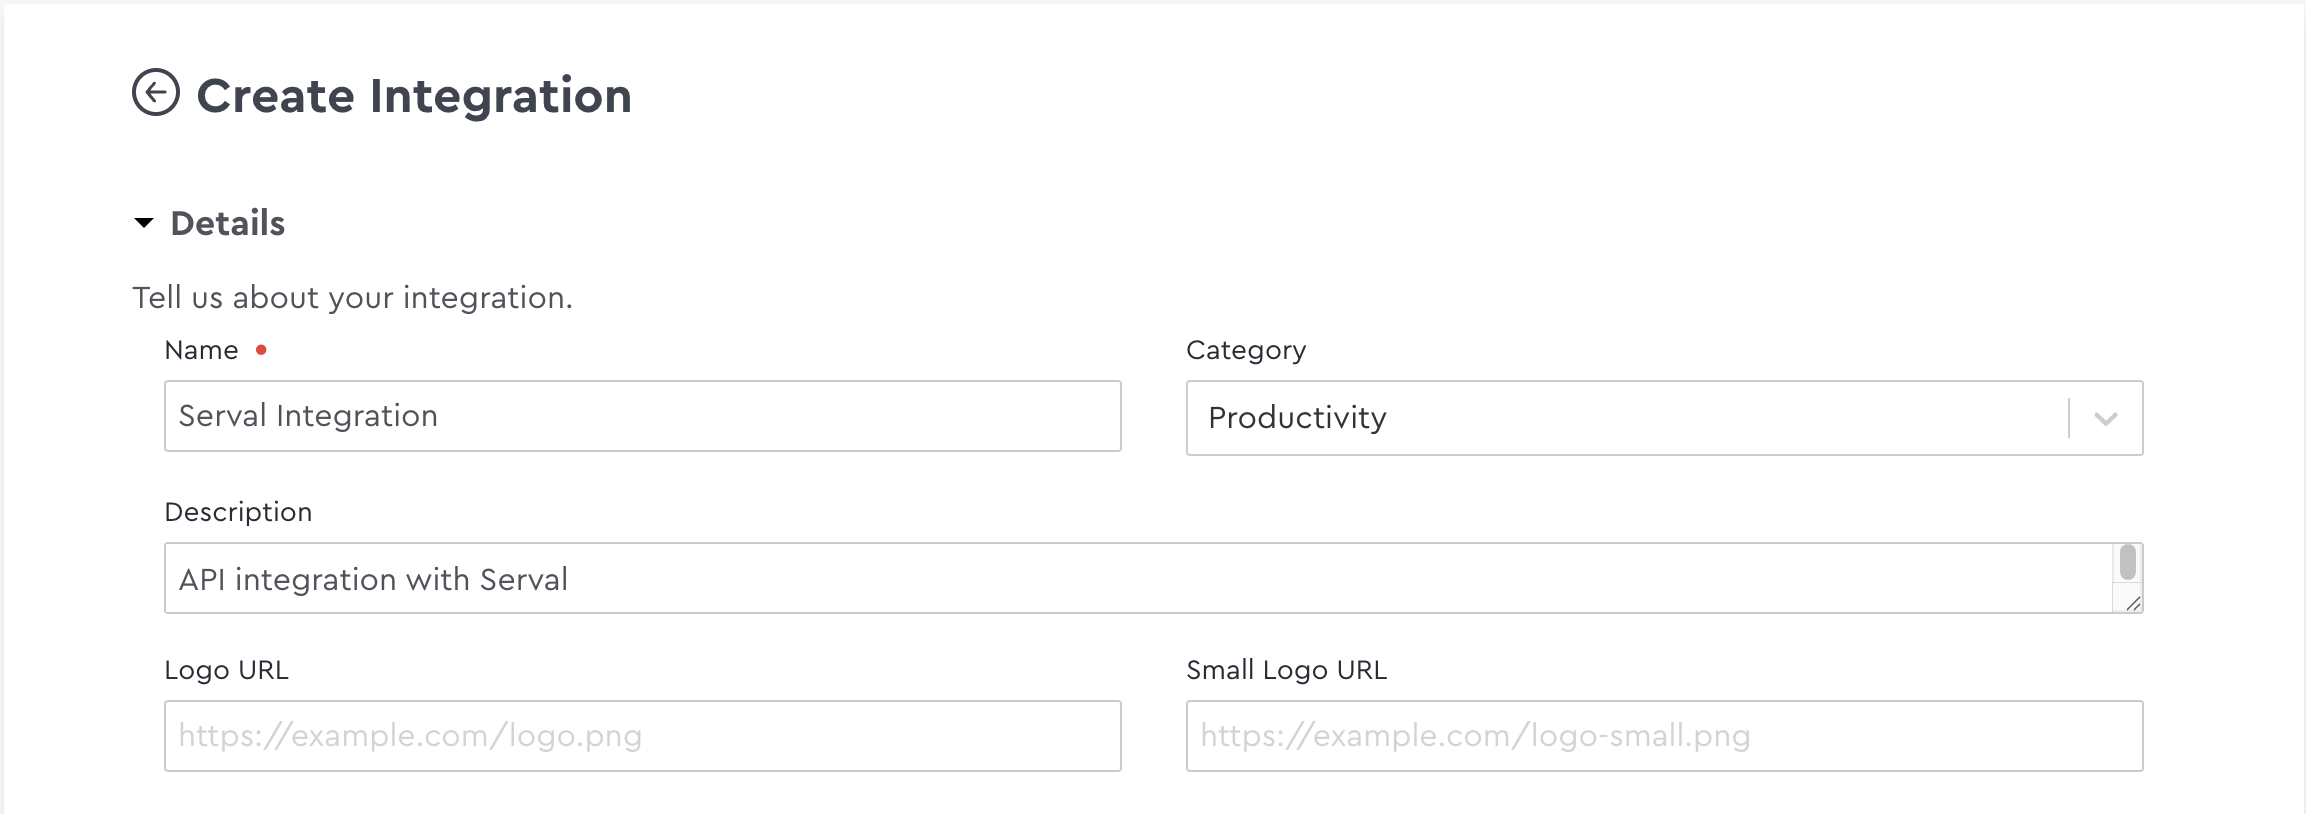
3. Configure your integration:
* **Name**: Provide a descriptive name (e.g., "Serval Integration")
* **Description**: Add a brief description of the integration's purpose
 ### Step 3: Configure API Scopes
Select the appropriate API scopes for your integration based on your needs:
### Step 3: Configure API Scopes
Select the appropriate API scopes for your integration based on your needs:
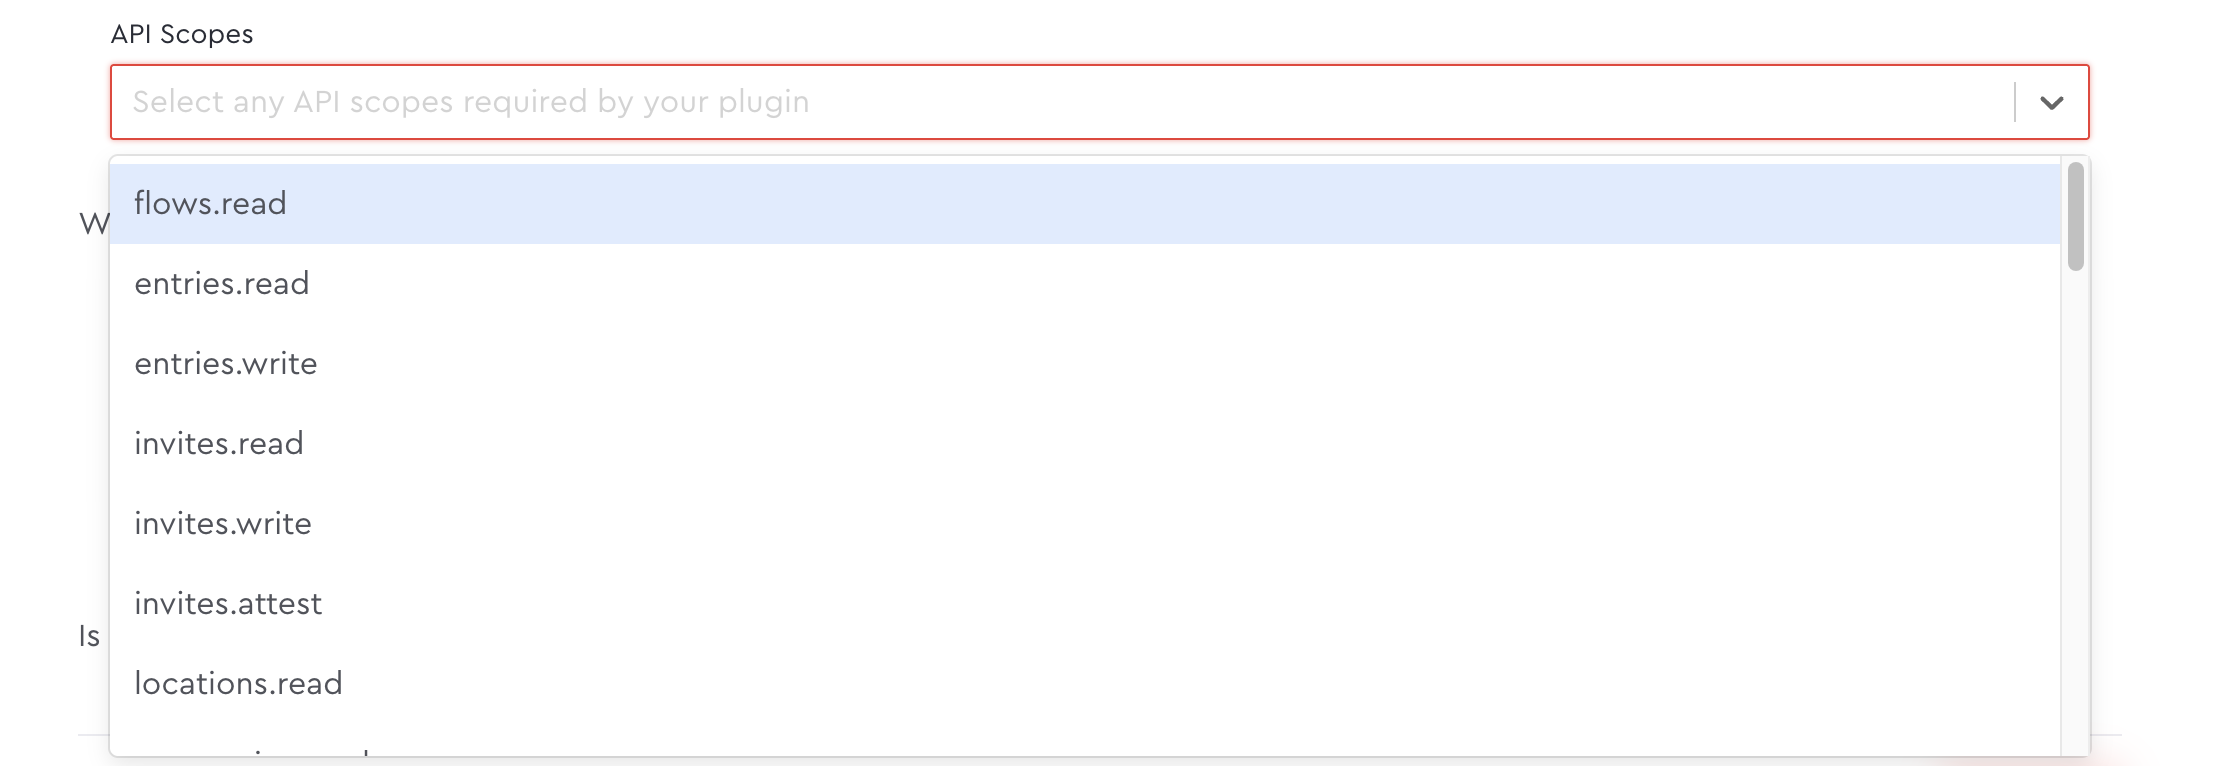 Start with minimal scopes and add more as needed. This follows the principle of least privilege and enhances security.
### Recommended Scopes
We recommend starting with these core scopes as a foundation for your Envoy integration:
| Scope | Description |
| ---------------- | -------------------------------------------- |
| `locations.read` | View location information and settings |
| `employees.read` | Access employee directory |
| `visitors.read` | View visitor information and check-in status |
| `visitors.write` | Create and update visitor records |
| `entries.read` | View entry logs and check-in data |
| `entries.write` | Create and manage entry records |
| `invites.read` | Access invitation details |
| `invites.write` | Create and manage invitations |
These scopes provide comprehensive access to manage visitors, invitations, and workplace data. Add additional scopes only as needed for specific use cases.
### Step 4: Enable the Integration
1. After selecting your scopes, check the box **"Is the integration ready to be displayed?"**
2. Click **Save** to create your integration
### Step 5: Retrieve Your Client API Key
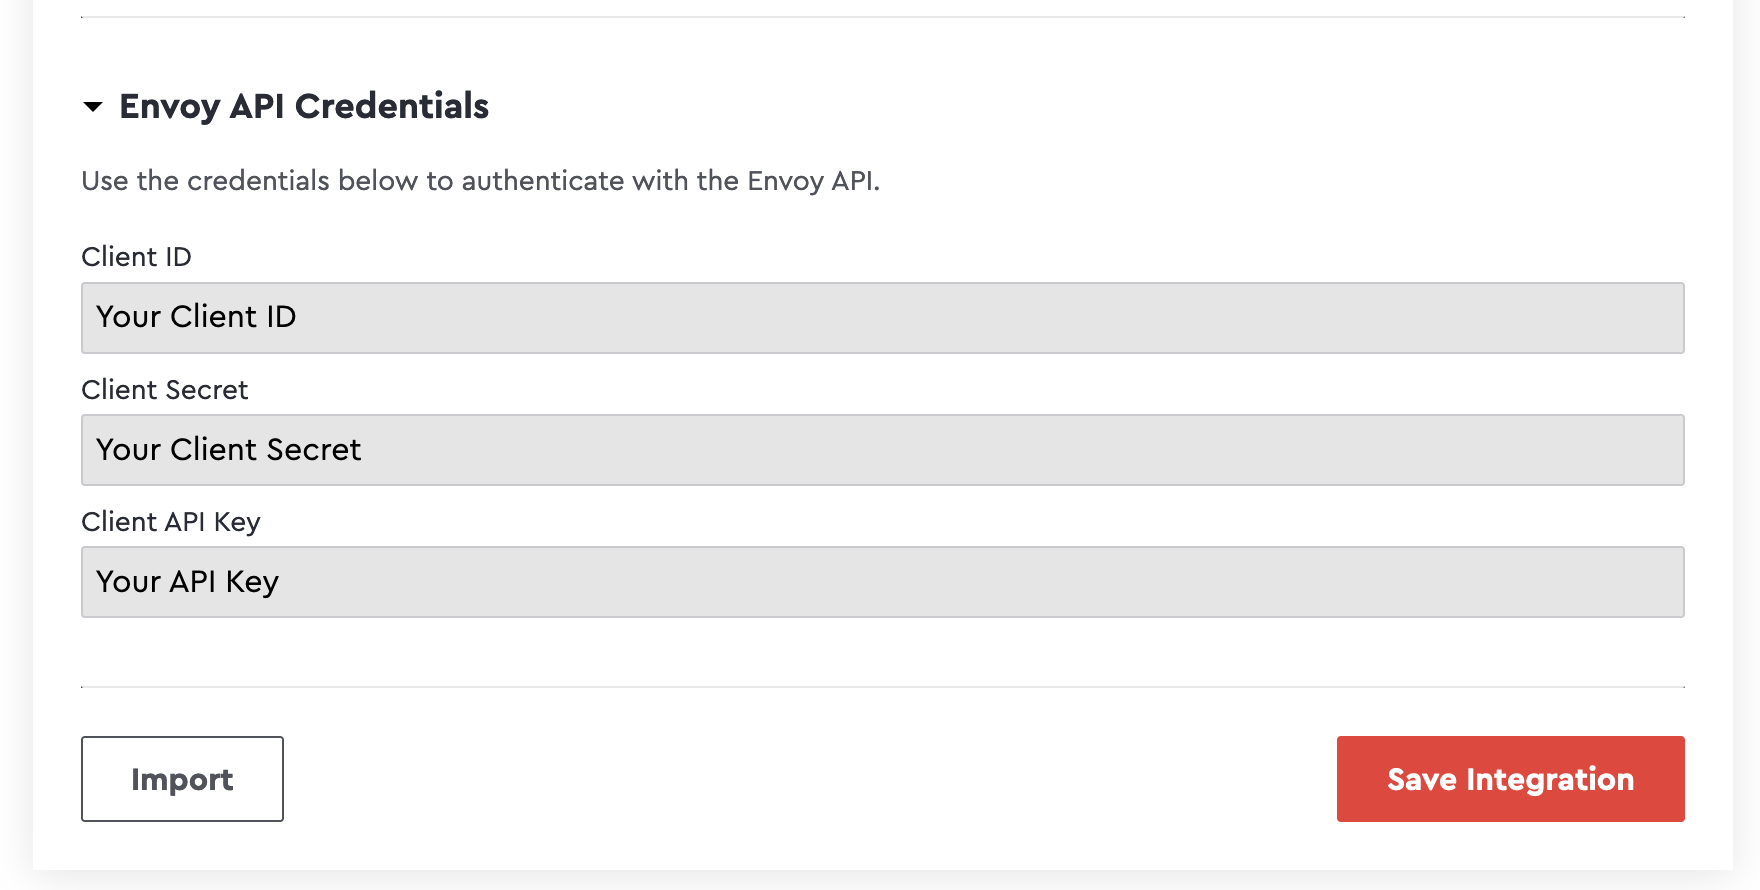
Once your integration is saved, Envoy will generate a 'Envoy API Credentials" dropdown below in the same page:
1. In 'Envoy API Credentials' dropdown, locate the **Client API Key** section
2. Copy the API key to your clipboard
3. Store this key securely - you'll need to provide this to Serval to complete the integration
Start with minimal scopes and add more as needed. This follows the principle of least privilege and enhances security.
### Recommended Scopes
We recommend starting with these core scopes as a foundation for your Envoy integration:
| Scope | Description |
| ---------------- | -------------------------------------------- |
| `locations.read` | View location information and settings |
| `employees.read` | Access employee directory |
| `visitors.read` | View visitor information and check-in status |
| `visitors.write` | Create and update visitor records |
| `entries.read` | View entry logs and check-in data |
| `entries.write` | Create and manage entry records |
| `invites.read` | Access invitation details |
| `invites.write` | Create and manage invitations |
These scopes provide comprehensive access to manage visitors, invitations, and workplace data. Add additional scopes only as needed for specific use cases.
### Step 4: Enable the Integration
1. After selecting your scopes, check the box **"Is the integration ready to be displayed?"**
2. Click **Save** to create your integration
### Step 5: Retrieve Your Client API Key
Once your integration is saved, Envoy will generate a 'Envoy API Credentials" dropdown below in the same page:
1. In 'Envoy API Credentials' dropdown, locate the **Client API Key** section
2. Copy the API key to your clipboard
3. Store this key securely - you'll need to provide this to Serval to complete the integration
 ### Step 6: Add the key to Serval
1. In Serval, navigate to **Applications → Connect new → Envoy → Connect**
2. Enter the following information:
| Field | Description |
| ------------- | ----------------------------------------------------------------------- |
| Instance Name | A friendly name for this integration (e.g., "Envoy Visitor Management") |
| API Key | The Client API Key you copied from Envoy |
3. Click **Submit** to complete the integration
Your Envoy integration is now connected! You can start creating workflows to automate visitor management and workplace operations.
***
## Troubleshooting
* Verify your API key is properly copied and pasted with no other characters
* Ensure you have granted proper permissions for healthchecks: `locations.read` and `companies.read`
### Step 6: Add the key to Serval
1. In Serval, navigate to **Applications → Connect new → Envoy → Connect**
2. Enter the following information:
| Field | Description |
| ------------- | ----------------------------------------------------------------------- |
| Instance Name | A friendly name for this integration (e.g., "Envoy Visitor Management") |
| API Key | The Client API Key you copied from Envoy |
3. Click **Submit** to complete the integration
Your Envoy integration is now connected! You can start creating workflows to automate visitor management and workplace operations.
***
## Troubleshooting
* Verify your API key is properly copied and pasted with no other characters
* Ensure you have granted proper permissions for healthchecks: `locations.read` and `companies.read`