> ## Documentation Index
> Fetch the complete documentation index at: https://serval-hannah-docs-custom-access.mintlify.site/llms.txt
> Use this file to discover all available pages before exploring further.
# Okta
## About Okta
Okta is a cloud identity and access-management platform that lets organisations securely manage users, groups and application access. Connecting Okta to Serval enables zero-touch provisioning, access reviews and incident-response workflows directly from chat.
## What the Okta integration enables
| Capability | Description |
| -------------------- | ---------------------------------------------------------------------------------------------- |
| Access Management | Create, update, and manage users and groups |
| Automation workflows | Streamline identity lifecycle management, provision users to applications via groups, and more |
Anything defined in the [Okta API](https://developer.okta.com/docs/api/) can be accessed through Serval.
***
## Okta Configuration
### 1. Create App Integration
* Log into your company's Okta admin console
* Navigate to Applications > Applications
* Select `Create App Integration`
.png?fit=max&auto=format&n=EhjbiLY--yHnfZGh&q=85&s=188bb36da7c507be276297a234b3c4e8) * Select API Services
* Select API Services
.png?fit=max&auto=format&n=EhjbiLY--yHnfZGh&q=85&s=66ad726cee51c72ee561f8ec5938da5f) * Title the app "Serval" (this can be any value, but make sure to give it a title that helps you remember that this application is for integration with the Serval platform.
* Hit Save & Finish creating the app integration.
### 2. Configure scopes/permissions
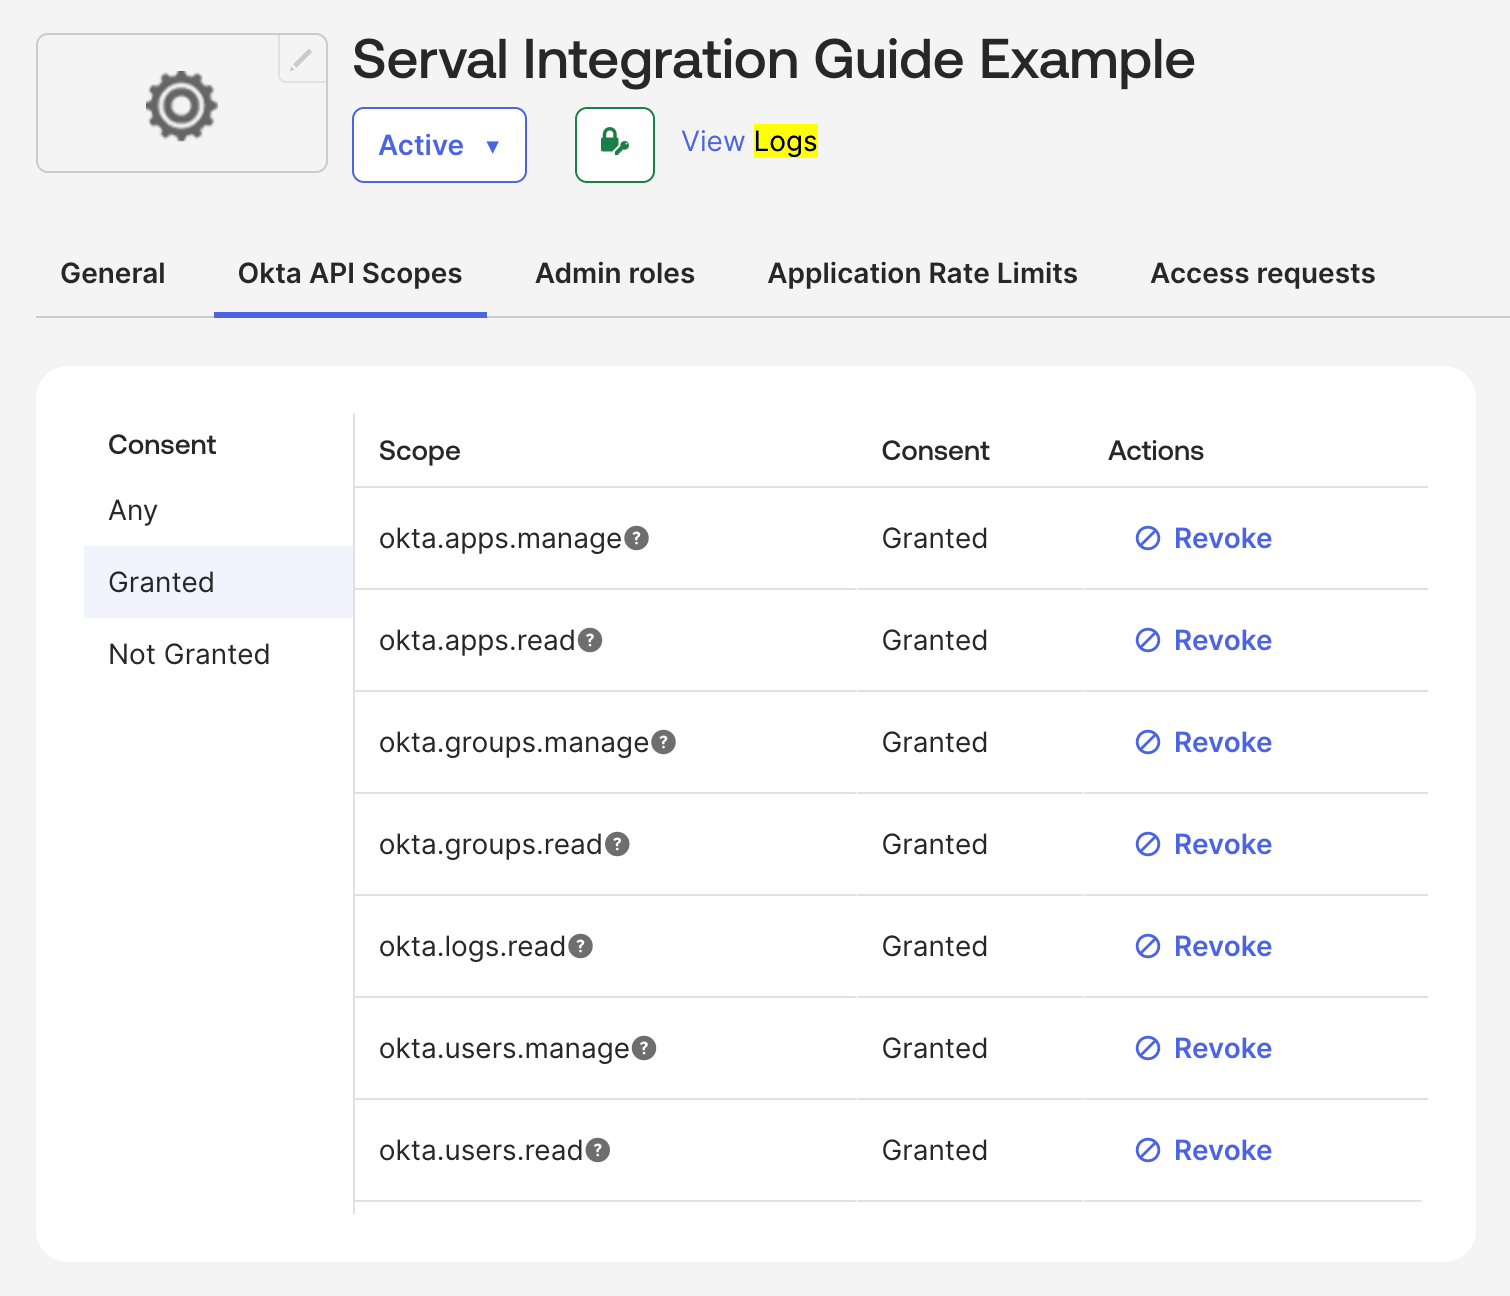
* Grant API scopes for the new integration. We recommend at least granting read access to users, groups and applications, as this will allow you to use read-only endpoints within Serval. However, to facilitate taking action in Okta to grant users access to applications or solve other common issues automatically, you will also need to grant some manage scopes.
* Read: [okta.users.read](https://developer.okta.com/docs/api/openapi/okta-management/management/tag/User/), [okta.groups.read](https://developer.okta.com/docs/api/openapi/okta-management/management/tag/Group/), [okta.apps.read](https://developer.okta.com/docs/api/openapi/okta-management/management/tag/Application/), [okta.logs.read](https://developer.okta.com/docs/api/openapi/okta-management/management/tag/SystemLog/)
* Write: [okta.users.manage](https://developer.okta.com/docs/api/openapi/okta-management/management/tag/User/), [okta.groups.manage](https://developer.okta.com/docs/api/openapi/okta-management/management/tag/Group/) and [okta.apps.manage](https://developer.okta.com/docs/api/openapi/okta-management/management/tag/Application/)
* Title the app "Serval" (this can be any value, but make sure to give it a title that helps you remember that this application is for integration with the Serval platform.
* Hit Save & Finish creating the app integration.
### 2. Configure scopes/permissions
* Grant API scopes for the new integration. We recommend at least granting read access to users, groups and applications, as this will allow you to use read-only endpoints within Serval. However, to facilitate taking action in Okta to grant users access to applications or solve other common issues automatically, you will also need to grant some manage scopes.
* Read: [okta.users.read](https://developer.okta.com/docs/api/openapi/okta-management/management/tag/User/), [okta.groups.read](https://developer.okta.com/docs/api/openapi/okta-management/management/tag/Group/), [okta.apps.read](https://developer.okta.com/docs/api/openapi/okta-management/management/tag/Application/), [okta.logs.read](https://developer.okta.com/docs/api/openapi/okta-management/management/tag/SystemLog/)
* Write: [okta.users.manage](https://developer.okta.com/docs/api/openapi/okta-management/management/tag/User/), [okta.groups.manage](https://developer.okta.com/docs/api/openapi/okta-management/management/tag/Group/) and [okta.apps.manage](https://developer.okta.com/docs/api/openapi/okta-management/management/tag/Application/)
 * Next, you will need to grant this app integration an admin role. Navigate to Admin roles and hit Edit Assignments.
.png?fit=max&auto=format&n=EhjbiLY--yHnfZGh&q=85&s=0a2061e61af2584583f287c127cf8ba3) * You must now assign roles to the application. [Here](https://support.okta.com/help/s/article/403-error-with-org2org-provisioning-with-oauth?language=en_US) is an article which explains the difference between roles and scopes. You can select one of the following options:
* Grant Serval the `Super Administrator` role. This will allow Serval to access all resources in your account, but only using the API scopes you configured previously.
* Assign another set of predefined roles. We recommend "Group Administrator", "Organization Administrator" and "Application Administrator" at a minimum. [Here](https://help.okta.com/en-us/content/topics/security/administrators-admin-comparison.htm) is an article which outlines the different permissions which can be accessed with these roles.
* Create a custom role. This option can be used if you want to configure fine grained permissions for Serval. Again, API scopes also govern which actions Serval can take in your Okta account.
* Optionally, you can create a new role.
* If you've chosen to create a new role, grant it the permissions you want Serval to be able to perform.
* You must now assign roles to the application. [Here](https://support.okta.com/help/s/article/403-error-with-org2org-provisioning-with-oauth?language=en_US) is an article which explains the difference between roles and scopes. You can select one of the following options:
* Grant Serval the `Super Administrator` role. This will allow Serval to access all resources in your account, but only using the API scopes you configured previously.
* Assign another set of predefined roles. We recommend "Group Administrator", "Organization Administrator" and "Application Administrator" at a minimum. [Here](https://help.okta.com/en-us/content/topics/security/administrators-admin-comparison.htm) is an article which outlines the different permissions which can be accessed with these roles.
* Create a custom role. This option can be used if you want to configure fine grained permissions for Serval. Again, API scopes also govern which actions Serval can take in your Okta account.
* Optionally, you can create a new role.
* If you've chosen to create a new role, grant it the permissions you want Serval to be able to perform.
.png?fit=max&auto=format&n=EhjbiLY--yHnfZGh&q=85&s=fbc536e5b61f5b391ab9f5187caf038e) * Now you will need to assign a resource set to this role. Add an assignment, select the ones you like, and hit Save Changes\\
* Now you will need to assign a resource set to this role. Add an assignment, select the ones you like, and hit Save Changes\\
.png?fit=max&auto=format&n=EhjbiLY--yHnfZGh&q=85&s=cafa04b9b992495bee5b0647c855fd2a) * If you don't already have an applicable resource set, you can create a resource set for this admin role to have control over. Navigate to Security → Administrators and then select the resources tab. Select Create a new resource set. Select the resources you want Serval to be able to manage and hit Create.\\
* If you don't already have an applicable resource set, you can create a resource set for this admin role to have control over. Navigate to Security → Administrators and then select the resources tab. Select Create a new resource set. Select the resources you want Serval to be able to manage and hit Create.\\
.png?fit=max&auto=format&n=EhjbiLY--yHnfZGh&q=85&s=b782dd1444924f3f80eeb23cfcfb4d46)
.png?fit=max&auto=format&n=EhjbiLY--yHnfZGh&q=85&s=9af922180a5c77437280e79331ff08f5) ### 3. Complete app integration configuration:
* In general settings, uncheck the box requiring DPoP and hit Save. We do not currently provide PoP.
### 3. Complete app integration configuration:
* In general settings, uncheck the box requiring DPoP and hit Save. We do not currently provide PoP.
.png?fit=max&auto=format&n=EhjbiLY--yHnfZGh&q=85&s=22f65d5f0ec6bc28448d59f3025e1b46) * Next, configure the client credentials. We use the private key/public key method for added security. Make sure your configuration looks like this:
* Next, configure the client credentials. We use the private key/public key method for added security. Make sure your configuration looks like this:
.png?fit=max&auto=format&n=EhjbiLY--yHnfZGh&q=85&s=bab00d0769edfb3a7dfd3f975d4b1b02) * Next, select `Add Key` and then generate one. Copy the JSON \*\*data to your clipboard and select Done.
* Note: Just because a key was generated does not mean it was saved, the key does not save until you select Done. Please verify that a key was actually created & saved.
* Next, select `Add Key` and then generate one. Copy the JSON \*\*data to your clipboard and select Done.
* Note: Just because a key was generated does not mean it was saved, the key does not save until you select Done. Please verify that a key was actually created & saved.
.png?fit=max&auto=format&n=EhjbiLY--yHnfZGh&q=85&s=2e37b8a77de91c25c5f66455146a6cf0) ## Serval Configuration
* In Serval, navigate to `Applications` and then the `Available` tab. Find the Okta integration and press `Connect`.
## Serval Configuration
* In Serval, navigate to `Applications` and then the `Available` tab. Find the Okta integration and press `Connect`.
.png?fit=max&auto=format&n=EhjbiLY--yHnfZGh&q=85&s=d8a9688b7a7db0ff5a006d3eedc9150b) * Copy the JSON from the last step into the `Client Secret` section.
* Your Instance ID should be the *domain* of your okta instance, so if your okta is found at `https://mycompany.okta.com/`, your instance ID would be `mycompany.okta.com` . If you are in the admin console, do *not* include the `-admin` in this (i.e. `mycompany-admin.okta.com`)
* Your Client ID can be found at the top of the app integration page:
* Copy the JSON from the last step into the `Client Secret` section.
* Your Instance ID should be the *domain* of your okta instance, so if your okta is found at `https://mycompany.okta.com/`, your instance ID would be `mycompany.okta.com` . If you are in the admin console, do *not* include the `-admin` in this (i.e. `mycompany-admin.okta.com`)
* Your Client ID can be found at the top of the app integration page:
.png?fit=max&auto=format&n=EhjbiLY--yHnfZGh&q=85&s=e27c325cdcf5f025fd9d02d0cfb3343f) * Enter scopes. The scopes you enter should be a comma separated list of what you granted the application previously in Okta. For example: `okta.apps.read, okta.apps.manage, okta.users.read, okta.users.manage, okta.groups.read, okta.groups.manage, okta.logs.read`
* Click `Save`
* You should now be able to build or install workflows which leverage Okta APIs, e.g. you could build a workflow for creating a new Okta group or a new user.
* Enter scopes. The scopes you enter should be a comma separated list of what you granted the application previously in Okta. For example: `okta.apps.read, okta.apps.manage, okta.users.read, okta.users.manage, okta.groups.read, okta.groups.manage, okta.logs.read`
* Click `Save`
* You should now be able to build or install workflows which leverage Okta APIs, e.g. you could build a workflow for creating a new Okta group or a new user.